Sunday, 6 October 2013

Vish Puri's Butter Chicken

The Case of the Deadly Butter Chicken 
By Tarquin Hall 

I came came across this light-hearted murder mystery by chance when I was at the book store a few weeks back. Not only did the title, "The Case of the Deadly Butter Chicken", catch my eye for obvious reasons, but so did the endorsement by Alexander McCall Smith, being "These books are little gems. They are beautifully written, amusing, and intensely readable". Considering how much I love ready McCall Smith's books, this was all the convincing I needed to put this title in my basket. 

This is Tarquin Hall's third installment of the Vish Puri mystery series. I do admit that I have not read the first two books, but frankly, they don't have food in the title!!!! I'll get to them at some point, I'm sure. (I think I must after reading this incredibly fun book...Vish Puri may be my new hero). Vish Puri (a.k.a. Puri, a.k.a. Chubby), India's Most Private Investigator, is a former military man turned private detective, who is in constant battle with his love of food and the number on his bathroom scale. Who isn't?! His adventure begins with a case of a stolen mustache...you read that right...a mustache mystery. This plays close to Puri's heart as he prides himself in having a magnificent mustache of his own. Although this is a very odd mystery, with the victim traumatized that his thirteen foot leviathan has been stolen from quite literally under his nose, the main mystery is when the father of a renowned cricketeer takes a bite of butter chicken at a cricket gala and dies before the guests' eyes. Puri is on the case! His quest to solve the murder takes him into the underworld of cricket betting, to reunite with old friends and as far away as Pakistan, a place he as hated and feared all his life. Since he is India's Most Private Detective, he certainly solves his case, but not without the help of Tubelight, Face Cream, Chanel No. 5 and his beloved Mummy-ji. 

Well as you can imagine, this was the perfect reason for me to try making butter chicken from scratch. You all know that I hadn't made a curry from scratch up until a few weeks ago when I made a vindaloo, so I might as well try to make a butter chicken, also known as Murgh Makhani from scratch too. Butter chicken needs very little introduction. This rich, buttery, creamy dish is likely the most well known of all Indian dishes, served in restaurants and homes alike. It is said to have originated in a restaurant called Moti Mahal in Delhi, India before the partition of British India. 

Butter chicken is not the same as the popular chicken tikka masala...the two dishes look similar and use grilled chicken in the sauce, but the base of each recipe is quite different. Butter chicken is made with pureed tomatoes, spices cooked in butter and finished with fresh cream. The trick is to cook the chicken in a tandoor (a traditional clay oven) where the temperature is much higher than in a regular oven. There have been many attempts to make the perfect butter chicken, but be wary of those recipes using oil as a substitute for butter...it is never as good or satisfying. If you must substitute the cream, then use half and half or evaporated milk so that the dish stays close to the true taste. 

Ingredients: 

  • 2 lbs chicken (washed, patted dry and cut into small pieces - use chicken with or without bones, thighs or a combination of breasts and thighs)
  • 1 teaspoon red chili powder
  • 1 tablespoon lemon juice
  • salt
  • butter/ghee* 


*Ghee is a class of clarified butter that originated in South Asia and is commonly used in South Asian (Indian, Bangladeshi, Nepali, Sri Lanken and Pakistani) cuisine. The word Ghee comes from Sanskrit and has several names around the world. Ghee is made by boiling butter and removing the residue. It is different from clarified butter in that the production of ghee includes simmering the butter along with milk solids so that they caramelize and make it nutty-tasting and aromatic. Spices can be added for flavour. Ghee has a long shelf life and needs no refrigeration if kept in an air-tight container to prevent oxidation. The texture, colour and taste of ghee depends on the quality of the butter and the duration of the boiling. It can be found in the ethnic areas of most major supermarkets. (I used regular butter in the below recipe.)

For marinade: 

  • 3/4 cup plain yogurt, strained, hung or use 1/2 cup Greek yogurt
  • 1.5 teaspoons kasuri methi/dried fenugreek leaves
  • 1/2 - 1 teaspoon turmeric 
  • 1 teaspoon gram masala 
  • 1.5 tablespoons mustard oil (or any other cooking oil substitute)
  • 1.5 tablespoon ginger paste
  • 1/2 tablespoon garlic paste

For sauce/Makani Masala

  • 2.5 inch fresh ginger (made into a paste)
  • 8-10 cloves of garlic (made into a paste)
  • 2-4 fresh green chili pepper (slit)
  • 4 tablespoons melted butter
  • 4 green cardamoms
  • 1.5 to 2.5 inch cinnamon stick
  • 3 cloves
  • 1 black cardamom
  • 1 teaspoon methi/fenugreek seeds
  • 3-3.5 cups tomato puree 
  • 1 tablespoon red chili powder/cayenne/paprika or to taste
  • 10 almonds (soaked, peeled and made into a paste) **I omitted this as there is a nut allergy in my family
  • 1 teaspoon gram masala 
  • 2 teaspoons kasuri methi/dried fenugreek leaves (crushed)
  • 1/2 tablespoon sugar
  • 1/2 cup + 2 tablespoons heavy cream

Preparation: 

Apply red chili powder, lemon juice, and salt to the chicken and set aside for 20 minutes. This is the first marinade.

Combine all the ingredients of the second marinade. Apply this marinade to the chicken and refrigerate for three to four hours, overnight works even better. 

Put the chicken on skewers and cook on a grill or in a preheated oven at 400 degrees for about 10 minutes. Turn midway. Cook until done. Do not overcook, as the chicken will dry out and get fibrous. Baste it with butter/ghee/oil a couple of times while cooking. 

Heat the butter/ghee/oil in a thick bottom pan. Add green cardamom, cloves and cinnamon. Sauté for a couple of minutes or until they start to sizzle and get fragrant; add the methi/fenugreek seeds. When the methi seeds sizzle, add the ginger and garlic pastes and the slit green chilies. Cook for five to eight minutes; the water from the paste would have evaporated and the ginger paste would have reduced in quantity. 

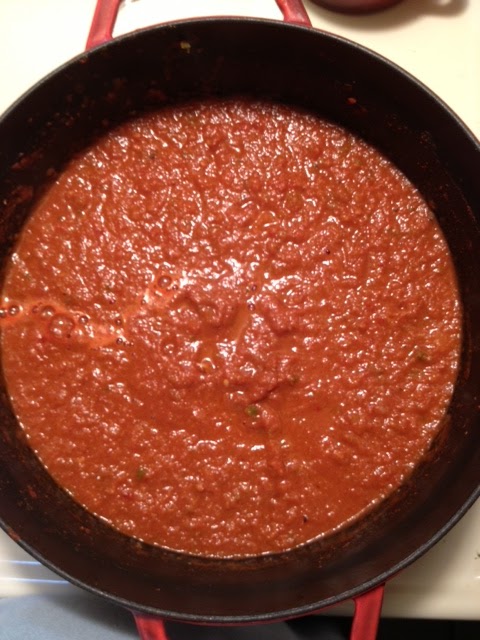
Add tomato puree, red chili powder, and salt. Cook at medium heat for about 15-20 minutes. The puree will reduce to a thick paste and the oil/ghee will separate from the sides of the pan. 

Add 2.5 cups of hot water to the pan, add the almond paste and bring to a boil. Reduce heat and simmer for about 15 minutes; add sugar and crushed methi. 

Add cooked grilled chicken pieces. Stir well to combine - the chicken will be well coated with the sauce. Cover and simmer for eight to ten minutes. Lower the heat and add garam masala and the heavy cream. Stir in the cream and simmer at low heat for about five more minutes. 

Garnish with fresh cilantro and add a splash of cream before serving. 

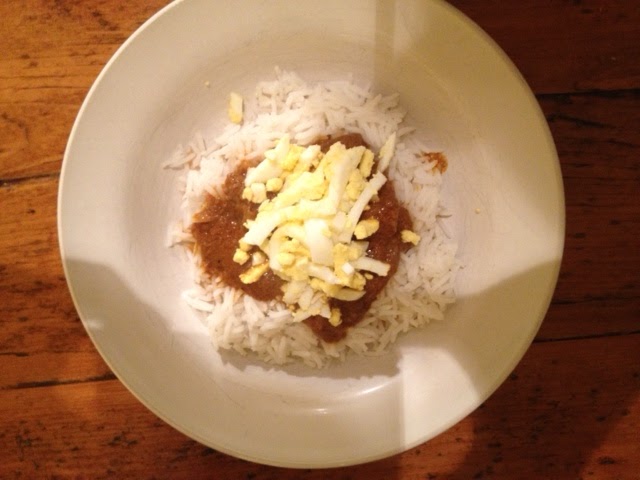
Serve hot with rice pulao and/or naan.


बॉन एपेतीत
bŏna ēpētīta

Sunday, 15 September 2013

Horatio Hornblower's Big Roast

Horatio Hornblower, my hero... I never would have thought I would have been so enraptured by a man of the high seas, but Mr. Hornblower has won me over. The series of stories by C.S. Forrestor (author of the wonderful African Queen) of the awkward and humble Horatio Hornblower are interesting, exciting and incredibly romantic. How could it not be romantic.....a story about an English man during the Napoleonic war, whose honour and duty are the most important things to him, other than fighting for his King?! 

If you haven't had the opportunity to read any of the stories (or the opportunity to watch the amazing tv movie series...seriously....so good and very true to the books), here is a little information about Mr. "Haitch", as he is sometimes called. As you can imagine, most of the food discussed in this series is awful and is usually spoiled food that a seaman has to endure throughout his time on the high seas. So I'm certainly not going to talk about biscuits with weevils in them...disgusting.  This is about Hornblower's story in Mr. Midshipman Hornblower, where he travelled to the Bay of Oran to resupply his ship, and then encountered the Black Plague (are you looking for the weevils now?). He sails to the coastal town to retrieve the food supplies and heads back to his ship, but since he and the men have been exposed to the Black Plague they are quarantined on the small supply ship, the Caroline, for three weeks.  Now the good news. The supply ship was packed with cattle. A pytain to clean up afterward, but delicious to eat. And the generous Hornblower allows the men to slaughter one cattle for their consumption. His theory...if they are going to die, might as well be happy and have a full belly. 

So here lies my inspiration for this blog. Beef. What the men on the Caroline ate was most likely boiled meat, but I am going to pretend that it was even more of a celebration. And how better to celebrate then with a wonderful roast. Now roast could mean a whole world of different things. The roast I am going to feature is beef brisket...a humble cut of meat (which has now become increasing popular)...but one that my mother has perfected. Its so good that family members have been known to do "brisket au jus shots". It is exactly what you think it is...  

A brisket is the cut of meat from the breast or the lower chest of beef (or veal), beneath the first five ribs and includes the deep pectorals which must be tenderized. Brisket can be cooked in many ways. Basting of the meat is often done during the long cooking process. This normally tough cut of meat (due to the collagen fibers that make up the significant connective tissue in the cut) is tenderized when the collagen is gelatinized (really....that's a silly word) which results in a more tender brisket. The fat cap which is often left attached to the brisket helps to keep the meat from drying during the prolonged cooking that is necessary to tenderize the meat. In stores, you will find that the long piece of meat is cut into two different parts...one that is a flat cut and one that is a point cut. The flat cut is leaner, but the point cut has more flavour due to a bit of extra fat (which is called the deckel). There are many different ways to cook brisket, but all of which are low and sloooow. 

I hope you enjoy my mother's recipe. And seriously...don't forget the aus jus or the horseradish!

Brisket Recipe

Ingredients: 


  • 1 beef brisket point (4 to 5lbs/2 to 3.5 kg)
  • 1 tbsp garlic powder
  • 1 tbsp onion powder
  • 1 tbsp celery seed
  • 1 tsp freshly ground pepper
  • 1 1/2 tsp Knorr Aromat Seasoning
  • 1 bay leaf
  • 1 tsp thyme
  • 1 tbsp dry parsley flakes
  • 1 cup beef broth
  • 1 tbsp Kitchen Bouquet
  • 1 tbsp Worcestershire sauce 

Preparation: 

Wipe beef with damp cloth and pat dry.

Mix together garlic powder, onion powder, celery seed, pepper and Knorr Aromat. Rub meat all over with spice mixture. Place in shallow roasting pan. 

Mix together bay leaf, thyme, parsley, beef broth, Kitchen Bouquet and Worcestershire sauce. Pour over brisket.

Cover pan with foil wrap and perforate in a few places to let steam escape. Place in 325F oven and cook 2 to 2 1/2 hours or until tender, about 30 minutes per pound. About 30 minutes before the brisket is done, remove foil and all brisket to brown. 

Remove brisket from pan and keep warm. Let rest 10 to 15 minutes before slicing. 

Drain off excess fat from pan drippings. Heat and serve with meat.  


באָן אַפּפּעטיט
bʼán ʼaṗṗʻtyt

 !P.S. Mom, Thanks for the photos

Saturday, 7 September 2013

Polly's Curry

Jim "Qwill" Qwilleran is on another adventure in The Cat Who Talked to Ghosts, by Lillian Jackson Braun.  The mustachioed former crime reporter and current millionaire (or is it billionaire) has met a woman friend, Polly, the head librarian at the Pickax library. Qwill enjoys Polly's company since she is interested in literature, is of the same age as him, and even though she is not quite as glamourous as the other women he usually becomes friendly with, there is a beauty about her.  They often spend time together over a good meal and reading to each other. After reading a story about Indian cooking together, Polly is inspired to make curries, a lot of curries. So many in fact, that although Qwill enjoys a good curry, he starts finding excuses to only stop by before and after meals!

Inspired by this silly infatuation with curries, chicken curries, beef curries, vegetable curries, shrimp curries, and every other curry under the sun, I wanted to make my own. I have never made a curry from scratch...I am loathe to admit that any curry that I have made in my kitchen has come from a pre-made bottle. So what better time then now to learn how to make a curry from scratch!!!!

As is my usual custom now, I did a little research on curry, specifically Vindaloo which is a spicy and popular Indian dish from the region of Goa. Mumbai-based Indians also have a variation of this dish. "Vinho de alho" is an old Portuguese pork dish preserved in vinho (red wine) and cooked with alho (garlic). The dish evolved with South Indian West Coast spices and became what we now know as Vindaloo. It is often one of the spiciest dishes on a western restaurant menu.  Western restaurants often serve this dish mixed with potatoes but  traditional Vindaloo dishes do not contain potato.

My boyfriend's wonderful mother makes a fantastic Vindaloo (without potato!!). One so spicy...well...we shouldn't talk about it. But it is super flavourful and wonderfully tasty. The Vindaloo recipe and a Raita recipe (to help put the fire out), is below.

Vindaloo Recipe:

Ingredients:
  • 2 lb. lean shoulder pork or lamb, or one 3 ½ lb. chicken, or 2 lb. raw shrimp (about 22 shrimps to the lb.)
  • 2/3 cup lemon juice, or as needed
  • ½ cup mild-flavoured vegetable oil, or as needed
  • 1 to 2 tsp. salt, to taste
  • 1 tsp. ground black pepper
  • 2 tsp. powered cumin
  • 2 tsp. powered mustard
  • 1 inch-thick slice fresh ginger-root, peeled and cut up
  • 3 cloves garlic
  • 1 large onion, peeled and cut into chunks
  • 2 small dried hot red chili peppers, crushed, or 2 tsp. hot red pepper flakes or to taste
  • 1 tsp. turmeric
  • 1 tsp. powered coriander
  • 1 tsp. powered cinnamon
  • 1 Tb. Sweet paprika
  • 1 to 2 tsp. sugar, or to taste
  • 1 to 2 cups boiling water, as needed
  • Serve with 2 cups cooked rice, preferably basmati and Raita (recipe below)

1.       Trim fat from meat and cut into 1-inch cubes. Or, cut chicken through bones into 12 pieces, first quartering, then disjointing wings and drumsticks, then chopping breasts and thighs in half. Remove skin as you work. Or, shell and devein raw shrimp. Place in glass or ceramic bowl.

2.       Combine 6 Tb. lemon juice, 2 Tb. oil, 1 tsp. black pepper, cumin and mustard. Coat meat, chicken or shrimp with mixture. Marinate meat or chicken for 2 hours at room  emperature; shrimp for 1 hour. If kitchen is warm, marinate in refrigerator but let stand at room temperature 15 minutes before cooking.

3.       Using blender or food processor (preferably with a small bowl), grind together ginger, garlic, and onion until you have a coarse paste. Scrape sides down to incorporate everything. Heat half of remaining oil in a 10- to 12-inch heavy skillet or casserole. Gently sauté ginger-garlic-onion paste for 5 minutes or until it begins to turn yellow. Stir in all remaining seasonings except sugar. Sauté for about 7 to 8 seconds, or until spices lose raw smell. Add more oil if needed. Stir in meat, chicken or shrimp with any liquid remaining in bowl. Sauté over low heat 5 minutes. Stir in 1 cup boiling water, or enough to come just below level of  eat or shrimp.

4.       Cover partially and simmer over low heat until tender, stirring frequently, adding more boiling water if needed to prevent scorching. Meats will take about 1 hour; chicken, about 45 minutes; and shrimp, 15 minutes. Adjust seasonings with lemon juice, salt and pepper, chilies and sugar. Simmer 5 minutes longer, or reheat before serving.

Serve with rice and raita.
Yield: About 6 servings


If you are looking to dress up the curry a little bit more, add some toppings for the table to enjoy. Try diced hard boiled egg, raisins, sliced bananas or shredded coconut for some fun!!!


Raita Recipe: 

Ingredients: 

  • 1 large unpeeled English hothouse cucumber, halved, seeded, coarsely grated 
  • 2 cups plain whole-milk yogurt or Greek yogurt
  • 1/4 cup (packed) chopped fresh mint
  • 1 teaspoon ground cumin
  • 1/4 teaspoon plus pinch of cayenne pepper

Wrap grated cucumber in kitchen towel and squeeze dry. Whisk yogurt, mint, cumin, and 1/4 teaspoon cayenne pepper in medium bowl to blend. Add cucumbers and toss to coat. Season raita to taste with salt and pepper. Cover and refrigerate at least 2 hours. (Can be prepared 1 day ahead. Keep refrigerated.) Sprinkle raita with pinch of cayenne pepper and serve.
Yield: About 8 servings

आप का खाना स्वादिष्ट हो (āp kā khānā svādiṣṭa ho)

Tuesday, 27 August 2013

Gatsby's Cocktail Party


When thinking of the Roaring Twenties, what does one imagine? Flapper dresses, prohibition, jazz, gangsters and magnificently extravagant and glamourous drinking parties that are all the more exciting because they could be broken up by police at any moment. When you have to use secret passwords and hidden doors, that's a party I want to be invited to! For me, it seems so romantic and fun, I wish I could go back in time (and jump into the realm of fiction) and experience just one of Jay Gatsby's amazing parties. But alas, I can't, so instead I will just try to make some Prohibition style drinks at home...sans flapper dress!

As most everyone knows, The Great Gatsby by F. Scott Fitzgerald is a novel that follows a cast of characters living on Long Island in the summer of 1922. The story revolves around Jay Gatsby, a mysterious millionaire who has extravagant parties at his mansion and who has a passion for Daisy Buchanan (who happens to be married to Tom Buchanan, a man having his own affair). I assume that you all know this classic novel so I don't even need to go there. You did read this in high school like I did, right??

The The Great Gatsby is literally drenched in alcohol (perfect for a blog about cocktails!). There are "floating rounds of cocktails" for the guests at all the glitzy parties, and Gatsby himself is alleged to have made his fortune by bootlegging. The sugary drinks featured in the book and during Prohibition were likely meant to disguise the bathtub gin and bootleg bourbon - so glad that we can use "proper" alcohol nowadays. Below are two drinks featured in the novel and two more that are inspired by it.  So lets go make a cocktail!

The Gin Rickey is one of two cocktails that are actually named in The Great Gatsby and is said to have been a favourite of Fitzgerald.  The drink appears on a summer day when Daisy tells her husband Tom to "make us a cold drink" so that she can let Gatsby know of her love for him without her husband around. Tom returns with "four gin rickeys that clicked with ice".  It was a staple during prohibition and consists of gin, lime and soda. Refreshing and delicious! 
a
Put three or four ice cubes in a highball glass, and squeeze in the juice of half a lime. Add around 60 ml of gin and top with soda. Rub the lime wedge around the rim, then drop in the glass.

Mint Julep

This is the second drink that is mentioned in the novel, when Daisy, Tom and Gatsby are having an argument in the hotel. "'l'll make you a mint julep," she tells her husband. "Then you won't sound so stupid to yourself". Wow. I wish I was so ballsy. This is a sugary drink (to cut the bourbon) and is officially a pre-Prohibition drink that likely started in the southern United States and slowly trickled northward. It survived Prohibition and became the official drink of The Kentucky Derby.

Mix a teaspoon of sugar (you can adjust the taste) with a splash of water in a highball glass until dissolved. Add a handful of mint leaves (around 10) and gently bruise with a muddler or wooden spoon. Fill the glass with crushed ice, then pur 60-90 ml of bourbon  depending on the size of your glass. Stir, top up with more crushed ice, and garnish with a few more mint leaves.

Between the Sheets

This cheeky drink is a version of the classic sidecar. It has rum, cognac and triple sec, with a good dose of lemon. This was supposedly a staple for Fitzgerald and friends and will certainly get you in the Roaring Twenties mood!

Mix 30 ml each of brandy, white rum and triple sec with 15 ml of fresh lemon juice in a shaker with ice. Shake, strain into a cocktail glass and garnish with a lemon twist.

Last but not least, the Champagne Cocktail, everyone's (including mine) fizzy favourite. This adds glitz and glam to any party. So pop that cork and let the bubbly flow! The Champagne Cocktail is sophisticated and glamourous and how I envision Daisy and Gatsby.

Place a sugar cub in a chilled champagne glass, add 2 or 3 dashes of bitters, fill the glass with champagne and squeeze a lemon twist on top.


Chin chin!

Monday, 12 August 2013

Popeye's Spanakopita

Popeye the Sailor, again not a literary character (although a comic strip one!) was good inspiration for the following recipe. When thinking of the characters of this iconic comic in terms of food, you have not only spinach loving Popeye, but girlfriend Olive Oyl, and her old beau Ham Gravy and Popeye's ward, Swee' Pea. And who can forget J. Wellington Wimpy the hamburger-loving moocher (a topic for a different blog!)? What a set of characters!! And why not create a recipe with one of those characters in mind?!

As most of us know, strong-arm comic strip character, Popeye the Sailor, has always toted that spinach makes you big and strong...which, as a child, I could even see that parents used this excuse to make me eat spinach, (mom and dad, you never had me fooled!), but as an adult, I love spinach. And I'm not the only one...as it happens, Popeye's popularity actually increased the sale of spinach in the U.S., needless to say, many a farmer became a Popeye fan! 

Although one would likely not consider Popeye Greek, I thought that preparing Spanakopita would be a good homage to this spinach lover. I have always enjoyed Spanakopita, but have never made it before...that phyllo pastry seems so daunting! But, alas, I discovered that it doesn't have to be so scary...its actually fun and simple to prepare. 

As many of you know, Spanakopita is a Greek pastry. It has a filling of chopped spinach and feta cheese, onions (or scallions) and some eggs...that sounds just about perfect to me!!! The filling is wrapped in the shape of a triangle in phyllo pastry. It is mostly eaten as a snack in Greece, but I think that a person could spread it out into a meal if they were so inclined. 

Here is a recipe that I found to be simple and tasty. I hope you enjoy as much as I did!

Ingredients:

1/2 cup vegetable oil
2 large onions, chopped
2 pkg frozen chopped spinach - thawed, drained and squeezed dry (10 ounce)
2 tbsp chopped fresh dill
2 tbsp all - purpose flour
2 pkg feta cheese, crumbled (4 ounce)
4 eggs, lightly beaten
salt and pepper to taste
1 1/2 pkg phyllo dough (16 ounce)
3/4 lb butter, melted

1. Preheat oven to 350 degrees F (175 degrees C).

2. Heat vegetable oil in a large saucepan over medium heat. Slowly cook and stir onions until softened. Mix in spinach, dill and flour. Cook approximately 10 minutes, or until most of the moisture has been absorbed. Remove from heat. Mix in feta cheese, eggs, salt and pepper.

3. Separate one sheet of phyllo from the stack and evenly brush with a light coating of butter. Place another sheet of phyllo over the butter and press the two sheets together. Cut the layered phyllo dough into long strips about 3 inches wide. Keep the remaining phyllo covered with plastic wrap to keep it from drying out.

4. Lay out one strip of phyllo at a time on your work surface with one of the narrow ends close to you. Place a heaping tablespoon of filling 1 inch from the end closest to you. Fold the bottom right corner over the filling to the left edge to form a triangle. Fold the triangle up, bringing the point at the bottom left up to rest along the left edge. Turn the lower left corner over to touch the right edge. Continue turning the triangle over in this manner until you reach the end of the phyllo. Repeat with the remaining filling and phyllo dough.

5. Place filled phyllo dough triangles on a large baking sheet and brush with the remaining butter. Bake in the preheated oven until golden brown, 45 minutes to 1 hour.


Enjoy as an appetizer or add a nice big greek salad and make it a meal!

Καλή όρεξη! (Kalí óreksi!)

Friday, 2 August 2013

"Dear" John's Meatloaf

As an avid reader of Nicholas Sparks novels (and watcher of their movie adaptations), I just had to include one of his novels in my blog. 

Dear John is a story about a soldier from South Carolina (a state that will always have a special place in my heart) who falls in love with a girl (Savannah) while on a two week leave. Theirs is a tale of how the heart can open so quickly. When John must return over seas (he can't tell her where...top secret stuff, I guess!) for his last tour they decide to correspond by letter and it appears that they will be able to make it for the long haul. But things can't be that easy. Just before his tour ends, 9/11 rocks the United States and John feels he must re-enlist to serve his country. As you can imagine, this has a rather damaging effect on their relationship and Savannah eventually stops corresponding with John and soon meets someone else. Its really quite sad. Another aspect of the story is John's fractured family life. He only has his father left and that is a rather strained relationship. 

But John's father, a reclusive man, who may or may not have a form of autism or obsessive compulsive disorder, does have a lot to do with food. He cooks all of his meals, but the unique part is that he schedules each of his meals each week....not new meals each week, but the same meal on the same day of the week...a bit of a 50's throwback! On Saturdays he always prepares meatloaf (on Sundays he prepares lasagna but we've already covered that a few weeks ago). So guess where this is going!!

Well, I started looking into meatloaf...the food not the singer, although I do love Paradise by the Dashboard Light....moving on.... Meatloaf is a humble and simple meal, but is also delicious and nostalgic (although I must admit, that for me, I do not remember my mother making meatloaf - she says she did....I wonder who is right!). 

Meatloaf is a dish of ground meat that is formed into a loaf and then baked or smoked and is usually made with ground beef, although sometimes people use lamb, pork, veal, venison, poultry or a combination of any of those. In the Great Depression, cooking meatloaf was a way for families to stretch the food budget by using inexpensive cuts of meat, grains, leftovers and some spices. 

Meatloaf has European origins and is a traditional German and Belgian dish. It is a cousin to the Dutch meatball. American meatloaf has its origin in scrapple, a mixture of ground pork ad cornmeal which was served by German-Americans since Colonial times. But meatloaf did not make its way into American cookbooks until the late 19th century. Meatloaf is very popular throughout many countries and a multitude of variations exist, often involving hard-boiled eggs. It is so popular in the States though, that in 2007 it was voted American's 7th favourite dish (Thanksgiving dinner is #1...figured someone would ask!). 

And now for the recipe. Hope you enjoy!

Ingredients: 

1 lb ground beef
1 to 2 tbsp horseradish
2 tbsp ketchup or chili sauce
2 tsp Worcestershire sauce
1 tsp salt
1/4 tsp black pepper
6 slices bacon, diced
2 cups chopped onions
1/2 cup thinly sliced sautéed mushrooms
1 1/4 cup cracker crumbs, divided
1 large egg
1/2 cup stock or broth

Preparation:

Preheat oven to 350F. Lightly grease a 9 x 5-inch loaf pan. 

Combine in a large bowl ground beef, horseradish, ketchup or chili sauce, Worcestershire sauce, salt, black pepper, bacon, onions, sautéed mushrooms 1 cup cracker crumbs and the egg. Mix with your hands until well blended. Shape into a loaf and roll in remaining cracker crumbs. Place in loaf pan and pour in stock or broth. 

Bake, basting occasionally, until meat loaf is firm to the touch or a thermometer inserted in the centre reads  160F, about an hour. Serve with gravy or ketchup. 

If you have left overs, like we usually do, a meatloaf sandwich on thick homemade or rustic bread is a always a good way to use it up. 

Enjoy your meal!

P.S. No photos this week. Meatloaf is delicious but not the most photogenic of meals!

Sunday, 28 July 2013

Hannah's Cookies

I have discovered, and I am sure that you have realized by now, that I enjoy reading a silly, light murder mystery. In fact, I really can't get enough of them. One I just found is the Chocolate Chip Cookie Murder by Joanne Fluke, and lucky for me, it is part of a series...can't get enough of those either! 

Well, the Chocolate Chip Cookie Murder is a story about Hannah, a cookie baker in small Town America who accidentally becomes a detective after discovering the body of her dairy delivery man in the alley behind her shop. Not only has he got her famous Chocolate Chip Crunch Cookies scattered all around him at the crime scene (maybe not the best for business), but her brother-in-law, a police man, is looking for a promotion to detective and Hannah wants to do anything to help him. So Hannah sets out to find the killer and the sleuthing begins. But as always, I am really looking for a new recipe and this book has them.

Hannah is an exceptional baker and does a number of catering jobs for people in the town and lucky for us, she gives us the recipes throughout the novel. She has a recipe for every occasion. There are recipes for Chocolate Chip Crunch Cookies (her sister's favourite), Regency Ginger Cookies (for the historical society), Black and Whites (to promote the new police cars), Chocolate-Covered Cherry Delights (that can just fix any problem), Old Fashioned Sugar Cookies (you just must have a good sugar cookie recipe) and last but certainly not least, Lovely Lemon Bar Cookies (perfect for a promotion celebration party!). 

I tried the Crunch recipe and I fell in love. Who wouldn't be intrigued by a cookie recipe with cornflakes in it! Certainly takes a classic to a new level. The recipe is below and you just must try them.

Chocolate Chip Crunch Cookies

Ingredients: 

1 cup butter (2 sticks, melted)
1 cup white sugar
1 cup brown sugar
2 teaspoons baking soda
1 teaspoon salt 
2 teaspoons vanilla
2 beaten eggs (fork beaten is fine)
2 1/2 cups flour (not sifted)
2 cups crushed corn flakes (just crush them up with your hands)
1-2 cups chocolate chips

Method: 

• Preheat oven to 375F, rack in the middle position. 

• Melt butter, add the sugars and stir. Add soda, salt, vanilla and beaten eggs. Then add flour and stir it in. Add crushed corn flakes and chocolate chips and mix it all thoroughly. 

• Form dough into walnut-sized balls with your fingers and place on a greased cookie sheet, 12 to a standard sheet. Press them down with a floured or greased fork in a crisscross pattern (the same method as peanut butter cookies). 

• Bake at 375F for 10 minutes. Cool on cookie sheet for 2 minutes, them remove to wire rack until they're completely cool. (The rack is important - it makes them crisp.)


Happy Baking!

Thursday, 18 July 2013

Tita's Enchilada's

Like Water for Chocolate by Laura Esquirel is the story of Tita, a girl destained for sadness and loneliness. She is the youngest daughter at a ranch in turn-of-the-century Mexico and due to family tradition, is not allowed to marry as she must take care of her mother until her mother's death. Not a destiny I would like. As you can imagine, she finds a man she loves, Pedro. When he is preparing to ask her mother, Elena, for Tita's hand, Elena is furious that Tita wants to break family tradition by marrying and insists that Pedro marry Rosauro, one of Tita's older sisters. Elena enjoys resorting to cruelty to get to Tita to behave in the way Elena deems fit. Tita is understandably heartbroken as she not only has to watch her sister marry the man she loves, she must cook the wedding feast.
 
But this is not the part of the story that I wish to focus on. I want to talk about the food! The book is divided into twelve parts, one for each month and each month has a different recipe. For instance, in January there are Christmas Rolls, February she makes the dreaded Chabela Wedding Cake, in March Tita makes Quail in Rose Petal Sauce, April is Turkey Mole with Almonds and Sesame Seeds and of course the list goes on. The author tells of the life of Tita, while also explaining how to cook each of the recipes she discusses. A very unique and interesting way to tell a story.
 
Tita was born in the ranch kitchen and ever since her birth the kitchen is where she is most comfortable. In fact, under the watchful eye of the ranch cook, Nacha, (who is like a mother to Tita) Tita learns all the traditional recipes and eventually becomes the ranch cook.  Interestingly, her cooking is most magical. When her tears, which are her way of expressing any emotion, fall into the food, they affect the person who eats it. If she is sad, the people become sad, if she is happy, they too become happy. And since Tita has very deep and intense emotions, her food can affect people very strongly. One of the funniest (and I suppose I mean dark funny) instances of this was at Rosaura and Pedro's wedding. While Tita prepared the wedding cake, she felt an intense longing, jealousy and sadness about the wedding and about not being able to be with Pedro. When the wedding guests ate the cake, they too felt incredibly sad and each of the guests became terribly sick. I am not able here to express the level of sickness each of the guests suffered...just think of the worst thing imaginable at a wedding...then double it. How amazing to be able to affect other people's emotions like that with your cooking!
 
Although there were twelve different recipes in Like Water for Chocolate, I am not going to use one of them. Instead, as I am inspired to cook some Mexican food, I will use one of my favourite Mexican recipes, enchiladas, refried beans and Spanish rice. Am I alone in saying that refried beans can be just the yummiest thing ever!?! In August Tita makes Champandongo, a recipe similar to enchiladas...almost a mexican lasagna with layers of tortillas, cheese and beef (and we know how I feel about lasagna!).
 
Enchiladas are corn tortillas rolled around a filing and covered with a chilli pepper sauce (enchilada sauce, yum!). They can be filled with a variety of ingredients, including meat, cheese, beans, potatoes, vegetables or seafood or, frankly, any other combination! They  originated in Mexico, where the practice of rolling tortillas around other food dates at least back to Mayan times (awesome!). Originally they were street food and were just tortillas dipped in chili sauce and eaten without fillings. They have come a long way! I hope you enjoy the recipes below.
 
Chicken Enchiladas
 
Ingredients:
 
2 large onions, chopped
4 medium jalapeño peppers, seeded and chopped
2 tablespoons finely chopped garlic
2 tablespoons vegetable oil
1/4 cup chili powder
2 teaspoons ground cumin
1/2 teaspoon ground red pepper
2 28oz cans diced tomatoes, drained
2 1/2 cups shredded cooked chicken (rotisserie chicken works great here)
12 corn tortillas
1 cup shredded cheddar or Monterey jack cheese
 
Preparation:
  1. Combine in a large skillet the onions, jalapeño peppers, garlic and vegetable oil. Cook over medium-high heat, stirring frequently, until the onions are translucent and just beginning to brown around the edges, about 7 minutes. 
  2. Stir in the chili powder, cumin and ground red pepper and cook for 1 minute, stirring constantly. Add the tomatoes and cook for 3 minutes, stirring frequently. 
  3. Let cool and thoroughly puree the mixture in a blender or food processor.
  4. In a medium bowl, combine the shredded chicken and 1/2 cup of the sauce. 
  5. Preheat the oven to 400F. 
  6. Pour 1/2 cup of the sauce over the bottom of a 9 x 13-inch baking dish. To make each enchilada, spoon 2 1/2 tablespoons of the chicken mixture down the centre of the tortilla, the roll the tortilla up into a cylinder. Arrange the enchiladas seam-side down in the baking dish. Cover with remaining sauce and the cheese. 
  7. Bake until the sauce begins to bubble, about 10 minutes. 
  8. Serve with sour cream and green onions. 


Refried Beans (Frijoles Refritos)
 
Ingredients:
 
2 tablespoons vegetable oil
1 medium onion, chopped
4 garlic cloves, minced
4 cups cooked black beans or pinto beans
1 cup reserved bean cooking liquid or water
Salt to taste
Queso fresco, feta or parmesan cheese
 
Preparation:
 
  1. Heat in a large skillet over medium-high heat the vegetable oil. Add the onion and cook, stirring often, until deep golden brown, about 10 minutes.
  2. Add the garlic and cook, stirring, for 1 minuted.
  3. Add the beans, 1 cup at a time, mashing each addition to ca coarse puree with a potato masher or the back of a spoon.
  4. Stir in the reserved bean cooking liquid, cooking over medium heat until the beans are a little soupier than you would like them - they will thicken as they sit. The whole mashing process should take 10 to 15 minutes.
  5. Season with salt to taste and serve warm with a garnish of queso fresco, feta or parmesan cheese.

 
Serve with plain or Spanish rice.
 
!Buen provecho!